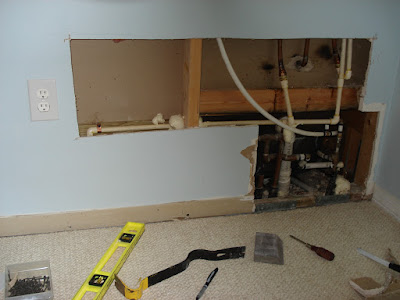
After some major plumbing issues in my house I decided to get the entire thing redone. I left that huge job to the pros, but when the pros were done I was left with some huge holes in my walls throughout the house.


And about a dozen or so more.
Step 1: Square up hole
First you need to square up the hole in your wall so the drywall you will eventually cut out will fit. What I do is take a level and hold it up next to the hole and draw a straight line as close to the hole as possible on all four sides.

Now use a drywall saw or hack saw blade to trim off the excess.


Step 2: Cut Drywall board
Next you are going to need to cut your drywall board. To do this you're going to need a razor knife or a very sharp knife of some kind and a drywall t-square. You don't have to use the drywall t-square, but it helps. First measure the newly cut hole in your wall. Using your t-square mark your board.

Now score the board on the finished side with your razor knife.

Apply pressure on board and it will snap in a nice clean line.

Cut paper along backside and flex in the other direction.

Step 3: Cut and screw boards
Next you are going to need some boards that you will use for backing on inside of the drywall. I used 1X4 cut into sections that were about 4 or 5 inches wider than the
hole in the wall. You can really use any scrap flat wood you have.

(sorry about blurry photos )
You will need boards to screw the newly cut drywall boards into where no studs are available.
Some people cut a board the same size of the distance between the two studs and wedge it in between two studs. I think this is unnecessary, and it usually doesn't work because you quite often have to get creative in how you place the boards. It normally only takes two boards on the left and right but some times pipes and other things can get in the way.
Holding the board in place, taking care not to put a drywall screw through any new pipe or your precious little fingers, screw the boards into place.

This hole was a pain and required two pieces of drywall and multiple boards as you can see below.

When you have your boards in place and screwed in, use a sanding block to knock off the loose edges and smooth up all the cuts.

Step 4: Mud
Now we get to play with mud! I used a small bucket of premixed drywall mud for this project. You will also need some putty knives of varying length. You probably just need a smaller 3" and a longer 6". The plastic variety will do fine and will run you under a dollar each.

Now you're going to load up your larger putty knife using your smaller one and start to fill up the cracks.

Soon you should have something like this:

Next you are going to place tape over the cracks. I used self-adhesive mesh tape which works very well, and I highly recommend using this over the paper variety., It will stay in place better and doesn't actually need mud to be placed first. The tape keeps the joints from cracking after they dry.

Now for another layer of mud over the tape.

OK, you are done for the day. The mud now has to dry for around 24 hours.
Step 5: Sanding
When the mud is dry it will turn bright white and its time to sand. Get out your sanding block. Using your sanding block, lightly sand off bumps and ridges and get it as smooth as possible. Try not to sand too far and gouge into the tape. As you sand, use your shop vac to suck up as much dust as possible because this stuff gets everywhere, and I mean everywhere, so also wear a mask. They sell a new type of drywall mud that creates less dust but I haven't tried it yet, if you have, let me know how it works.

After you finish the sanding clean up as much dust as possible and get ready for the next layer of mud. Its the same as before just go a little wider and feather out the
edges to make as smooth as possible. You will repeat this process of waiting and sanding and applying mud a total of three times in all. When you have finished this, the wall should be smooth.
Step 6:painting
Now all that's left is to prime and paint your wall. Just be sure to use a roller with the same texture as the paint in place.


After you paint you can replace your baseboards. The sad thing is this part of the wall is right behind a dresser and I could have probably just pushed it up against the wall and no one would have ever noticed the stupid hole to start with.


2 comments:
This blog site is pretty good! How was it made . I view something genuinely interesting about your site so I saved to my bookmarks . You can visit my site.
Drywall Repair"
Very detailed blog and drywall repair pictures, you shown all the essential steps and procedures.
drywall renovations calgary
Post a Comment